I've been dying to post this bag on the blog. So here it is, pattern and all!

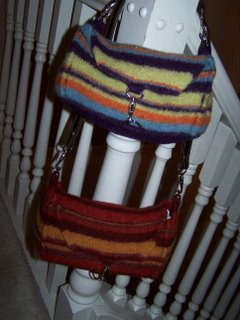
Striped “Armpit” Bag with Hand-stitched Details
and Handle Options
I wanted to knit a small curved bag similar to the popular bags worn with a short shoulder strap, and tucked under the armpit.
This felted bag is knit in one piece. You first knit the bottom, then pick up stitches to knit the body of the bag in the round, then bind off and continue on one long side edge only, for the flap. Hardware for the straps and closure is held in place by picked up knitted tabs that are sewn to secure. The hand stitching on the corners is decorative and provides more shape and support to the bag. The handle may be knitted or purchased.
Size:
Approx. 9 1/2” long, 4 1/2” wide, 4” deep – after felting
Finished size depends on gauge and felting time. My bottom rectangle measured 11 1/4” long by 5 3/4” wide before felting.
Gauge before felting: 18 stitches = 4” on 5mm needles.
Materials:
Solid colored bag: 4 balls elann.com Peruvian Highland Wool in color of your choice.
Striped bag: 5 balls (2 balls color A, 1 each of colors B,C,D) elann.com Peruvian Highland Wool in colors of your choice.
Model bag:
Color A: Eggplant
Color B: Starlight Blue
Color C: Pumpkin
Color D: Peridot
- 5mm (US 8) 24” or 29” circular needle
- 5mm (US 8) straight needles (optional, but helpful)
- 4 stitch markers (one in a different color to mark the beginning of the row helps)
- Tapestry needle
- (2) 1” or 1 1/2” D-rings or circular rings to attach the handles (unless handle is knitted and sewn directly to bag)
- 1 fastener to close the bag. Options: snap closure, button, magnet clasp. Model bag uses a D-ring fastened to the bottom of the bag and a lobster claw fastened to a tab on the flap.
- Purchased or recycled belt, purse strap, or canvas strap for handle (unless handle is knitted)
*Tips: I find nice handles on second-hand purses at thrift stores. Handle can be any length, but “armpit” length is approx. 18-22” long with room for adjustment.
Bottom:
With color A, cast on 48 stitches on flat or circular needle.
Starting with a knit row (RS) work 30 rows of stockinette stitch, ending on a purl row.
Bind off on RS
Body of bag:
Switch to circular needle if you were using flat needles for the bottom.
With color B, and with WS facing you, Pick up and knit 48 stitches along one long edge. Place marker (PM); pick up 28 stitches along short edge, PM; pick up 48 stitches along second long edge, PM; pick up 48 stitches along second short edge (152 stitches total). PM at the beginning of the round.
*Note: Picking up stitches with the WS facing produces a decorative stitch in color B on the bottom of the bag and a visible ridge along the outside bottom of the bag. When felted the bottom will match the hand-stitched/reinforced look of the sides.
Join needles and knit in the round so that the RS of the bottom is facing out and will match the RS of knitting in the round. (Note: this means you will be turning the work over and knitting in the opposite direction in which you picked up stitches)
Knit in the round, changing yarn colors according to the stripe pattern.
Color B: Knit 8 rounds
Color C: Knit 5 rounds
Color D: Knit 3 rounds
Color A: Knit 2 rounds
Color B: Knit 1 round
Color C: Knit 1 round
Color D: Knit 8 rounds
Color A: Knit 6 rounds
Color B: Knit 3 rounds
Color C: Knit 2 rounds
Color D: Knit 1 round
Color A: Knit 1 round
(total of 41 rounds before side decreases)
Color B: knit 5 rounds while working side decreases.
Decrease round:
*Slip marker, K2, SSK, K to 4st before next marker; K2tog, K2
Slip marker and K48 across long edge
Repeat from * for second side edge and long edge.
Work decrease round five times in total until you have 18 stitches between each side marker. Use a short piece of yarn to mark the corners of the bag before binding off sides for flap.
Continuing in Color B, Bind off a total of 84 stitches (18 side, 48 length, 18 side). Knit across the remaining 48 stitches of fourth side. Remove markers. Switch to flat needles if preferred.
Flap:
Working with remaining 48 stitches, knit back and forth in SS in stripe pattern. Continue in stripe pattern when working flap decreases. (Note: yarn colors are changed on both knit and purl rows)
Flap decreases are worked from * on alternate RS rows as follows: K2, SSK, K across to
last four stitches; K2tog, K2
Stripe Pattern:
Color A: Work 5 rows
Color B: Work 8 rows
Color A: Work 1 row
Color D: Work 1 row
Color C: Work 2 rows
Color B: Work 3 rows *Begin flap decreases on 1st of these 3 rows and continue every RS row for remainder of flap.
Color A: Work 6 rows
Color D: Work 8 rows
Color C: Work 1 row
Color B: Work 1 row
Color A: Work 2 rows; Then Work bind-off row (final decrease worked on B/O row)
Finishing Details:
Weave in tails
Decorative Side Stitching:
Working with right side of bag facing you, pinch the stitches of one corner of the bag together for a few stitches on either side of corner marker. Using a strand of color A, Sew a backstitch that shows up about a knit stitch away from either side of the corner. This will create a ridge at each corner with visible stitching on both sides. If you want the stitching to show up well, go over each stitch twice. Work from the bottom corner of the bag and follow the curve of the side decreases to the top edge.
Repeat for all four corners; weave in ends
Attach Hardware:
Use Color A for all knitted tabs
Pick up and knit 9 stitches in the centre of each bound-off side edge. Work 10 rows of stockinette stitch and bind off. Fold knitted tab over flat edge of D-ring and sew securely to the inside of the bag. (work both side edges the same)
Fold flap edge in half to find the centre and pick up 5 stitches. Work 6 rows stockinette stitch and bind off. Fold knitted tab to inside and secure to edge of flap. If you are installing a hook or claw, you can fold the tab through the loop of that. If you prefer a clean edge on the flap, skip this step.
If you need a D-ring at the centre bottom of bag for your hook or lobster claw, fold bag in half to find the centre and use a doubled strand of colour A, sew D-ring securely in place by looping yarn around the flat edge several times.
Felt Bag, block and allow to dry. (Tip: paper towels stuffed in damp bag can be useful to hold the shape while it dries)
Handle Options:
Knit a handle by casting on 9 st. in Color A. Work in garter stitch until handle is 30” long; bind off. Felt; trim to desired size and sew securely to D-rings on side edges of bag.
Or…buckle, sew, or clip purchased handle to side D-rings.
*Note: the people at Elann liked the design and use of hardware, but thought the bag might need a liner (zipped?) to secure the contents inside. If you want or need a liner, go ahead! I like to live dangerously...


14 comments:
Just gorgeous, Jayne QOS (Queen of Stripes). It's a masterpiece! Yiou are so kind to share the pattern.
its wonderful Jayne, I know how it feels to not have your design selected but we will perservere!!!!
Jayne, you are still a winner, in my eyes! Thanks for the pattern (I'll add it to my list)
:)
Jayne, it is a great bag! I like the clips and the larger size. Hey, if I took up felting, I wouldn't have to be so careful weaving in ends, huh?? Thank you for sharing the pattern; I have a friend who will be very happy to have it.
I like it very much, Jayne. I think it's a good look!
Thanks everybody -- I really like this bag too. It's just my type. A little bag to tuck under my arm. I'm already working on a second one in autumn reds. I'll post it when it's done. It's a pretty quick knit, and now that I know the spit splice, the ends will be a lot faster. I think a few people I know will be getting one of these for Christmas!
Before I sent my bag off to elann I switched out the D-rings for slightly smaller ones than the ones that show in the photo. 1" D-rings look smaller and better. I'll re-photograph when elann sends the bag back.
The colour choices are endless -- let me know if you want ideas on other colourways.
Pretty bag. I'll have to save this for the future when I'm ready to give felting a try. (Although I suppose if I botch it and overfelt, it could become a toy purse for little M, lol)
I LOVE this bag. I'd started something different with some Noro I've had around forever and don't like it much, so I think I'll frog it and try your bag (and I've got a lining idea too, so I'll probably add one). It's the perfect shape and I love the hardware.
Holy Cow, Jayne!! It's fabulous!
What a cute bag!
Now, the BIG question, the one that brings together all the felted Jayne-ness of the past few weeks...
(Can you see what is coming here?)
Have you tried it in SWS?...
Because I am thinking that that could be awesome....
Hmmm...SWS...now there's a thought!
I wonder how big...er...small it would come out, even if you did the same cast-ons, but with huge needles. That would be thick!
Jayne, that is a seriously snazzy & stylish bag...I love it! I'd already started to cut the handles & D-rings off my old bags before discarding, now I have a pattern to use with it. Thanks for sharing!
Jayne: what a functional and stylish bag! I printed it out. Thank you for the pattern. SK
I'm trying to find the photo and pattern of your runner-up purse that is on Elann's website on the left side. Where on your blog can I find this? Thanks! And congrats; it's a beautiful bag!
Post a Comment