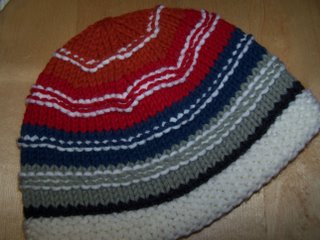
This is the hat I wear all the time. It has a garter stitch band, and I threw in a few garter ridges along the way to add texture.

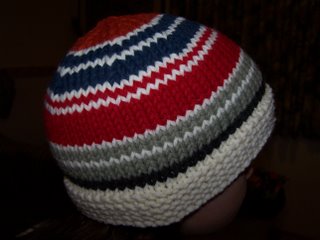
This is the exact same pattern for the hat, done with the garter stitch band, but no garter stitched details in the stripes.

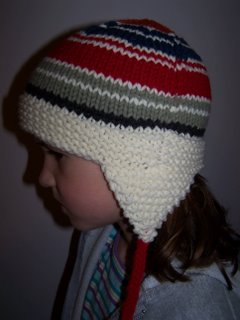
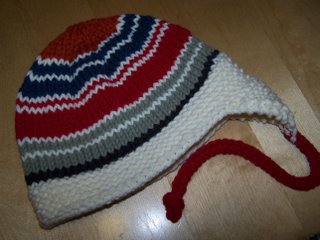
This is the hat with ear-flaps. Well...one ear flap because I wanted to be able to show the plain side too. I'll add the other flap...later.

If you're an observant knitter, you'll notice that the ear-flap side is the "bad side" because that's where the round joins and the stripes go a bit wonky. I do my best when weaving in tails to even things up, but there's always a bit of flotz. No problem if you don't stripe. You can always put the wonk at the back, but I like to center an ear-flap over that part. Tends to distract the eye away from it IMO. Or you can be super anal and figure out a way to keep the overlapped bits from showing.
When I knit the hat without flaps, I wear the seam at the back.
This is my husband in the hat to show you that on his fat-head (I have permission to say this), it is kind of a beanie. My kids and I have the same size head. Doug has a super-sized head. You'll want to consider these things if you make this hat using my pattern.

Same hat having a shot by itself. I like bright colourful striped hats. Especially on kids. But the hat can be made plain or with different stripes or whatever turns your crank. I was thinking of making the iCord on the other side blue or charcoal.

If you want to make this hat in any of its incarnations...here is a FREE recipe, courtesy of me. I'm such a nice person!
*Take note: I am telling you how I made MY hat. You will have to decide how wide and deep and all that you want your hat to be.
Matt's Hat (I call it this because I made an ear-flaps version for my 13-yr-old nephew Matt last Christmas, and apparently he did not take it off all winter). I made Matt's hat about 6" long before shaping the crown and it came down right to his eyes. Teenagers sometimes like that kind of thing.
I used: Red Heart Cozy Wool in a bunch of great colours. 16" circular needle (6mm/US 10); set of 4 6mm DPN's
Gauge: 14 st = 4" on 6mm needles in SS
Cast on 64 stitches on the 16" circular, PM, join in round and knit a garter stitch band (beginning by purling the first row). Do I need to mention that you get garter stitch in the round by alternating knit/purl rows?? I begin with purl and knit 1 1/2 - 2" of garter (5 ridges on my hat), ending after a knit row.
Then I knit another 3 3/4 of main body of hat (total of 5 1/2" from the beginning, or longer if you want) before shaping the crown.
I shape the crown by placing markers every 8 stitches (total of 8 sections) and knitting 2 together (the last 2 stitches before the marker) every other row (plain knitting between) until I have 8 stitches left. I cut the yarn, thread on a needle and pick up the remaining 8 loops purl-wise off the DPN's, pull snug and fasten on the inside of the hat. You can use the yarn tail to fasten on a pom-pom, if you MUST have one.
The stripe pattern on my hat is:
White for the band / earflaps
2 rows charcoal
3 rows sage
1 row white
2 rows sage
1 row white
5 rows red
1 row white
1 row red
1 row white
3 rows blue (I began decreases on the second blue row)
1 row white
2 rows blue
1 row white
remainder: orange
Earflaps: hold hat with brim up and crown down, with RS facing you. Count 8 stitches from the center seam to the right. P/U and knit 15 st. from that point. Knit three rows in garter.
On 4th row (RS) K1, ssk, knit to last three st. K2tog, K1
Next row: knit
Repeat two rows until 3 st. remain. Use the 3 st to carry on in iCord for 12-14" or whatever length you like. I sometimes change colour for the iCord, as I did in red here. When the iCord is long enough, I draw the the yarn through the 3 live stitches on the end and draw it up through the cord to hide it. Then I tie a knot with the bottom inch of two of the iCord. Some people make pom-poms for the ends, or a fringe, or whatever. Some people eat cars.
You repeat the flap on the other side by folding the hat neatly in half and line up the other flap to match. Very scientific. Some people count to make it perfect.
Have fun!!


6 comments:
Cute hat! I have a link bookmarked for knitting jogless stripes in the round - http://www.knitting-and.com/knitting/tips/jogless.htm - might be of use? (oh, and I think I've said it before, but I love the felted bag pattern, it's adorable). I just need to decide what colours to use.
I will definitely check that out, Gaile (the jogless stripes).
If you make the bag, I want to see it! I'm already thinking about making a third one.
Ok, I'm a little stumped and I know I shouldn't be...I just can't figure out the abbreviation PM that you use at the start of the pattern...Cast on 64 stitches, PM, join into a round and knit...
Help?!
Luuuvv the pattern...can't wait to start!!
tammy- i think it stands for place marker. just a guess! but i really want to make one of these hats for myself !
-maddie
This is a great pattern! We have a new fun site where we are collecting photos of hats with earflaps and I would love it if you would let us include this one. It's Sylacauga Phlaphappies
Thanks!
I am curious, have you ever designed, or do you know of, a pattern that has earflaps, that just extend over the top of the head with a band rather than a full hat? It also would just tie under the chin.
I am thinking that just continuing the earflap width, if it is about 4", woul be about right but just wondering if the decreasing would ruin the look....you know, one side increased and one decreased.
Like I said, just curious... Thanks.
Post a Comment