
I wanted to knit a small curved bag similar to the popular bags worn with a short shoulder strap, and tucked under the arm.

This felted bag is knit in one piece. You first knit the bottom, then pick up stitches to knit the body of the bag in the round, then bind off and continue on one long side edge only, for the flap. Hardware for the straps and closure is held in place by picked up knitted tabs that are sewn to secure. The hand stitching on the corners is decorative and provides more shape and support to the bag. The handle may be knitted or purchased.
Size:
Approx. 9 1/2” long, 4 1/2” wide, 4” deep – after felting
Finished size depends on gauge and felting time. My bottom rectangle measured 11 1/4” long by 5 3/4” wide before felting.
Gauge before felting: 18 stitches = 4” on 5mm needles.
Materials:
Solid colored bag: 4 balls (400m) elann.com Peruvian Highland Wool in color of your choice (or other feltable worsted weight yarn)
Striped bag: 5 balls (2 balls color A, 1 each of colors B,C,D) elann.com Peruvian Highland Wool in colors of your choice.
Model bag:
Color A: Eggplant (110m)
Color B: Starlight Blue (100m)
Color C: Pumpkin (50m)
Color D: Peridot (50m)
- 5mm (US 8) 24” or 29” circular needle
- 5mm (US 8) straight needles (optional, but helpful)
- 4 stitch markers (one in a different color to mark the beginning of the row helps)
- Tapestry needle
- (2) 1” or 1 1/2” D-rings or circular rings to attach the handles (unless handle is knitted and sewn directly to bag)
- 1 fastener to close the bag. Options: snap closure, button, magnet clasp. Model bag uses a D-ring fastened to the bottom of the bag and a lobster claw fastened to a tab on the flap.
- Purchased or recycled belt, purse strap, or canvas strap for handle (unless handle is knitted)
*Tips: I find nice handles on second-hand purses at thrift stores. Handle can be any length, but “armpit” length is approx. 18-22” long with room for adjustment.
Bottom:
With color A, cast on 48 stitches on flat or circular needle.
Starting with a knit row (RS) work 30 rows of stockinette stitch, ending on a purl row.
Bind off on RS
Body of bag:
Switch to circular needle if you were using flat needles for the bottom.
With color B, and with WS facing you, Pick up and knit 48 stitches along one long edge. Place marker (PM); pick up 28 stitches along short edge, PM; pick up 48 stitches along second long edge, PM; pick up 48 stitches along second short edge (152 stitches total). PM at the beginning of the round.
*Note: Picking up stitches with the WS facing produces a decorative stitch in color B on the bottom of the bag and a visible ridge along the outside bottom of the bag. When felted the bottom will match the hand-stitched/reinforced look of the sides.
Join needles and knit in the round so that the RS of the bottom is facing out and will match the RS of knitting in the round. (Note: this means you will be turning the work over and knitting in the opposite direction in which you picked up stitches)
Knit in the round, changing yarn colors according to the stripe pattern.
Color B: Knit 8 rounds
Color C: Knit 5 rounds
Color D: Knit 3 rounds
Color A: Knit 2 rounds
Color B: Knit 1 round
Color C: Knit 1 round
Color D: Knit 8 rounds
Color A: Knit 6 rounds
Color B: Knit 3 rounds
Color C: Knit 2 rounds
Color D: Knit 1 round
Color A: Knit 1 round
(total of 41 rounds before side decreases)
Color B: knit 5 rounds while working side decreases.
Decrease round:
*Slip marker, K2, SSK, K to 4st before next marker; K2tog, K2
Slip marker and K48 across long edge
Repeat from * for second side edge and long edge.
Work decrease round five times in total until you have 18 stitches between each side marker. Use a short piece of yarn to mark the corners of the bag before binding off sides for flap.
Continuing in Color B, Bind off a total of 84 stitches (18 side, 48 length, 18 side). Knit across the remaining 48 stitches of fourth side. Remove markers. Switch to flat needles if preferred.
Flap:
Working with remaining 48 stitches, knit back and forth in SS in stripe pattern. Continue in stripe pattern when working flap decreases. (Note: yarn colors are changed on both knit and purl rows)
Flap decreases are worked from * on alternate RS rows as follows: K2, SSK, K across to
last four stitches; K2tog, K2
Stripe Pattern:
Color A: Work 5 rows
Color B: Work 8 rows
Color A: Work 1 row
Color D: Work 1 row
Color C: Work 2 rows
Color B: Work 3 rows *Begin flap decreases on 1st of these 3 rows and continue every RS row for remainder of flap.
Color A: Work 6 rows
Color D: Work 8 rows
Color C: Work 1 row
Color B: Work 1 row
Color A: Work 2 rows; Then Work bind-off row (final decrease worked on B/O row)
Finishing Details:
Weave in tails
Decorative Side Stitching:
Working with right side of bag facing you, pinch the stitches of one corner of the bag together for a few stitches on either side of corner marker. Using a strand of color A, Sew a backstitch that shows up about a knit stitch away from either side of the corner. This will create a ridge at each corner with visible stitching on both sides. If you want the stitching to show up well, go over each stitch twice. Work from the bottom corner of the bag and follow the curve of the side decreases to the top edge.
Repeat for all four corners; weave in ends
Attach Hardware:
Use Color A for all knitted tabs
Pick up and knit 9 stitches in the centre of each bound-off side edge. Work 10 rows of stockinette stitch and bind off. Fold knitted tab over flat edge of D-ring and sew securely to the inside of the bag. (work both side edges the same)
Fold flap edge in half to find the centre and pick up 5 stitches. Work 6 rows stockinette stitch and bind off. Fold knitted tab to inside and secure to edge of flap. If you are installing a hook or claw, you can fold the tab through the loop of that. If you prefer a clean edge on the flap, skip this step.
If you need a D-ring at the centre bottom of bag for your hook or lobster claw, fold bag in half to find the centre and use a doubled strand of colour A, sew D-ring securely in place by looping yarn around the flat edge several times.
Felt Bag, block and allow to dry. (Tip: paper towels stuffed in damp bag can be useful to hold the shape while it dries)
Handle Options:
Knit a handle by casting on 9 st. in Color A. Work in garter stitch until handle is 30” long; bind off. Felt; trim to desired size and sew securely to D-rings on side edges of bag.
Or…buckle, sew, or clip purchased handle to side D-rings.
*Note: the people at Elann liked the design and use of hardware, but thought the bag might need a liner (zipped?) to secure the contents inside. If you want or need a liner, go ahead! I like to live dangerously...
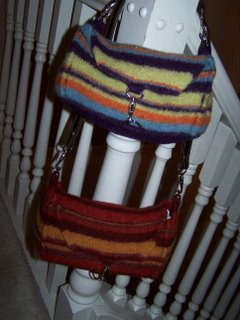
I made a second bag in fall colours. This time, I spit-spliced all the ends. So much easier at the finishing stage.
Here it is all felted, blocked and drying:

Here it is pre-felting. I've taken several shots to show the hand-stitched detailing, and how the hardware goes on.

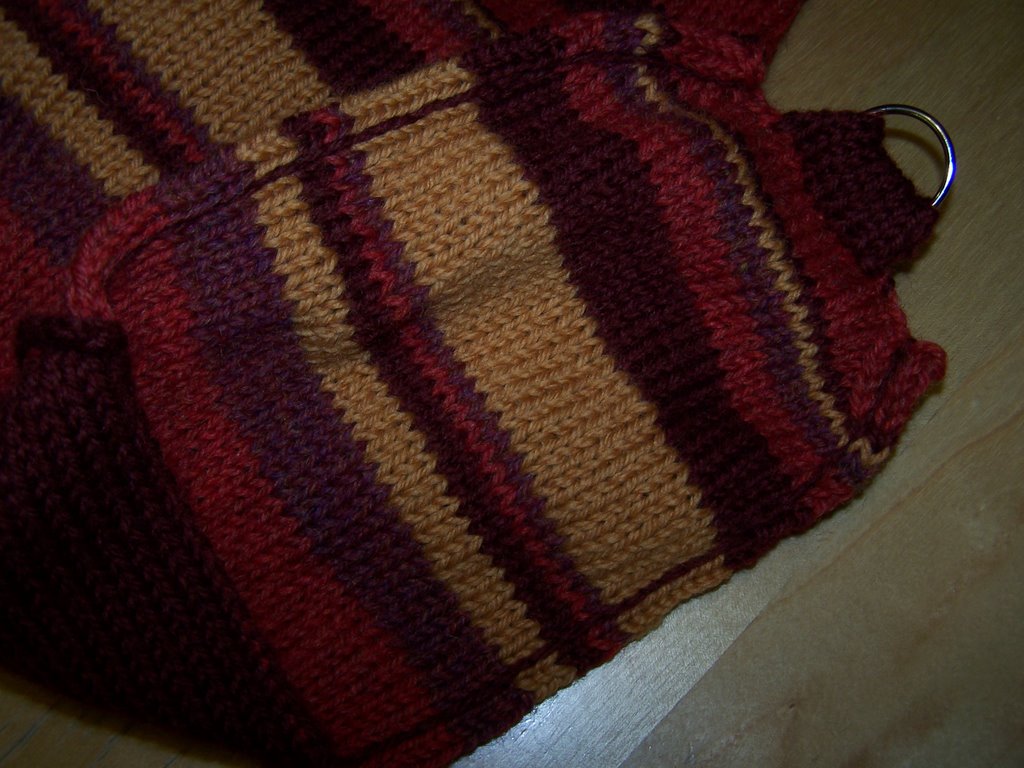


I knit the second bag exactly like the first one.
The bag is knit in elann.com's Highland Wool (although any feltable worsted weight would do). I used the following colours:
Colour A: Oxblood (I got away with one ball exactly, but if you're worried, get two)
Colour B: Red Maple (one ball)
Colour C: Spiced Wine (half a ball)
Colour D: Allspice (half a ball)


29 comments:
They are soooo cute!! I can't wait to finish mine, I'm going to work on it tonight. :-)
So fabulous! I love the design details-so smart! One question-where did you get the hardware?
Thank you for your kind comments.
Anonymous, I checked out your finished bag, and it turned out great!
Condith, you are very welcome, hope you enjoy it.
Amy, I bought a used purse from a Canadian thrift store chain called Valu-Village. The purse had the kind of straps and hooks I needed, so I salvaged them and re=used. I have since discovered that you can buy nice D=rings and hook closures (and a few other useful bits of hardware) at Michael's craft store (and probably Jo-ann's although I've never been there). I still raid thrift stores for handles, and often useful hardware as well.
I love this bag!! what a great pattern thanks so much for sharing!! hope to make it as soon as the one i am working on is done!!! will have to se about finding the hard ware think it really makes the bag!! hugs Linda
Jayne, you are a Goddess. Thank you for this pattern. It's a totally hot bag and I was so excited to cast on. I don't even really care much for felted bags, but this one... I am just FLIPPING for it! Bravo!!
These are very cute. I am curious about the gauge. How many rows?
Thanks!
Thanks, Kristin! Hope you have fun with it.
Anonymous, that's a good question. I got aran gauge with worsted yarn on 5mm needles. So 18 st.= 4" and 24 rows. I don't think it matters if it turns out a bit longer (your bag will just be deeper), but you probably don't want shorter than that.
Thanks so much for the info on the gauge. I promised my 6 year old daughter I would make her some slippers and then I am right into these. Great job, they are adorable.
Thanks again!
Just finished felting the bag. I used yarn from a nearby mill in Devon, UK, which I knew felted well, and I am really pleased with the results. I hope my daughter will be too when I give her the bag. Thanks. Carol
Thanks for posting this pattern. I have just started working on mine, which I could not resist once the yarn arrived--the baby blanket will just have to wait!
Hi Carol and thelesters!
Thanks for leaving comments. Hope your bags turn out great!
I found this pattern by accident, but am so glad that I did. I just finished it in charcoal gray with a hot pink stiching...it's really cute. I can't wait for it to dry so I can use it.
Jayne, here it is! So cute!
Your bag turned out great, the lesters, thanks for giving me the link.
anonymous, I'd love to see the black and hot pink bag. That sounds very funky!
Oh wow. This bag is amazing! I'm pretty new to knitting, but I'm dying to try this out sometime.
Welcome to knitting, Lisa. You'll be able to do this. The knitting part is easy-peasy. Have fun!
My wild rendition is complete! Hope you like how it came out. =)
Hi Jayne
What a super funky bag!!! This will definitely be my next knitting project! And I will probably be the only one in Denmark to own such a bag - I just love that about knitting :o)
Thanks for sharing the pattern!!
Regards,
Marie-Katrine, Copenhagen (Denmark)
that is an adorable bag! i'm going to pass on the pattern to my knitting friends.
this looks really cute, and i want to make it for my friend's birthday. but i'm only a beginner and haven't made much but scarves and hats and little bags. do you think i'm up for this challenge?
This is awsome! Thanks so much! I spent hours searching for something like this, and this is perfect! What a great Christmas gift it'll make! Thanks again!
I love this purse! I finished my first one last weekend and am almost done with my second purse. I plan to make at least 3 more for Christmas. Thanks for introducing me to elann.com. Linda
I love this bag!!
Thank You for posting the pattern.I am working onit and I have a pic posted on my blog.
Hi, Jayne,
I´m Ute from Lübeck in Germany. I found your pattrn in ravelry - and it´s fabulous. It will be the next to start with. Many thanks for this free pattern you share with others. Best wishes from Germany.
Nice blog as for me. It would be great to read a bit more concerning this theme.
By the way check the design I've made myself A level escort
So simple knited bag and looks so nice. Thanks for sharing.
Thank you for sharing this pattern! I knitted the bag with homespun wool: the result is just wonderful (lots of jealous friends). You can view the result on my (Dutch) blog
http://warmewollenwanten.web-log.nl/warme_wollen_wanten/ook-zelfgemaakt/
LOL,
Jet
is there away way u can put or add a side pocket on for a cell phone.
Post a Comment